5 Steps to Deploy a Static Site with a Custom Domain
5 Steps to Deploy a Static Site with a Custom Domain
Deploying a static site with a custom domain is simple. Here’s how you can do it in 5 steps:
- Prepare Your Static Site Files: Organize your site with essential files like
index.html, CSS, JS, and a404.html. Use tools like Jekyll, Hugo, or Eleventy to build your site. - Upload to Hostjar.io: Sign up for Hostjar.io, choose a plan, and upload your files via drag-and-drop or manual selection. Verify your site using the provided temporary URL.
- Set Up a Custom Domain: Add your domain in Hostjar.io, configure DNS settings (A and CNAME records), and let Hostjar.io handle SSL certificates automatically.
- Adjust Site Settings: Enable password protection, manage SEO visibility, and generate a QR code for easy sharing.
- Launch and Test: Verify your domain, ensure SSL is active, and test your site across browsers and devices. Use Hostjar.io's analytics and tools to monitor performance.
Quick Comparison of Site Generators
| Generator | Best For | Build Time | Learning Curve |
|---|---|---|---|
| Jekyll | Blogs, Documentation | Under 1 minute | Moderate |
| Hugo | Large Sites | Under 10 seconds | Steep |
| Next.js | React Applications | 1-2 minutes | Moderate |
| Eleventy | Simple Projects | Under 30 seconds | Easy |
Why Hostjar.io? It simplifies hosting with features like global CDN delivery, instant SSL, built-in analytics, and flexible plans starting at $9/month. Whether you’re a beginner or a pro, these tools make deployment fast and secure.
Step 1: Set Up Your Static Site
Static Site Basics
A static site serves pre-built HTML, CSS, and JavaScript to every visitor. These components work together to create the structure, design, and interactivity of your site.
Here's what your static site should include:
index.html: The main entry point of your site.css/folder: Stores your stylesheets.js/folder: Holds your JavaScript files.images/directory: Contains media assets like images.404.html: A custom error page for broken links.
Once you've got these essentials, pick a tool that fits your project.
Site Building Options
There are several tools you can use to create your static site. Here's a quick comparison:
| Generator | Best For | Build Time | Learning Curve |
|---|---|---|---|
| Jekyll | Blogs, Documentation | Under 1 minute | Moderate |
| Hugo | Large Sites | Under 10 seconds | Steep |
| Next.js (Static Export) | React Applications | 1-2 minutes | Moderate |
| Eleventy | Simple Projects | Under 30 seconds | Easy |
If you're a beginner, Eleventy is a great choice thanks to its simple setup and minimal configuration. For larger projects or React-based sites, tools like Hugo or Next.js might be better suited.
File Structure Setup
Organizing your files properly is key to smooth deployment. Follow this recommended structure:
my-static-site/
├── public/
│   ├── index.html
│   ├── css/
│   ├── js/
│   └── images/
├── src/
│   ├── templates/
│   └── content/
└── config files
Tips for organizing your site:
- Keep the root directory clean by placing most files in subfolders.
- Use clear, lowercase filenames without spaces for easier management.
- Compress images and minify CSS/JavaScript to improve performance.
Before deploying, double-check these points:
- Internal links use relative paths.
- The site has been tested locally.
- All necessary files are in the
publicdirectory. - Meta tags and SEO elements are properly set up.
Step 2: Upload Files to Hostjar.io
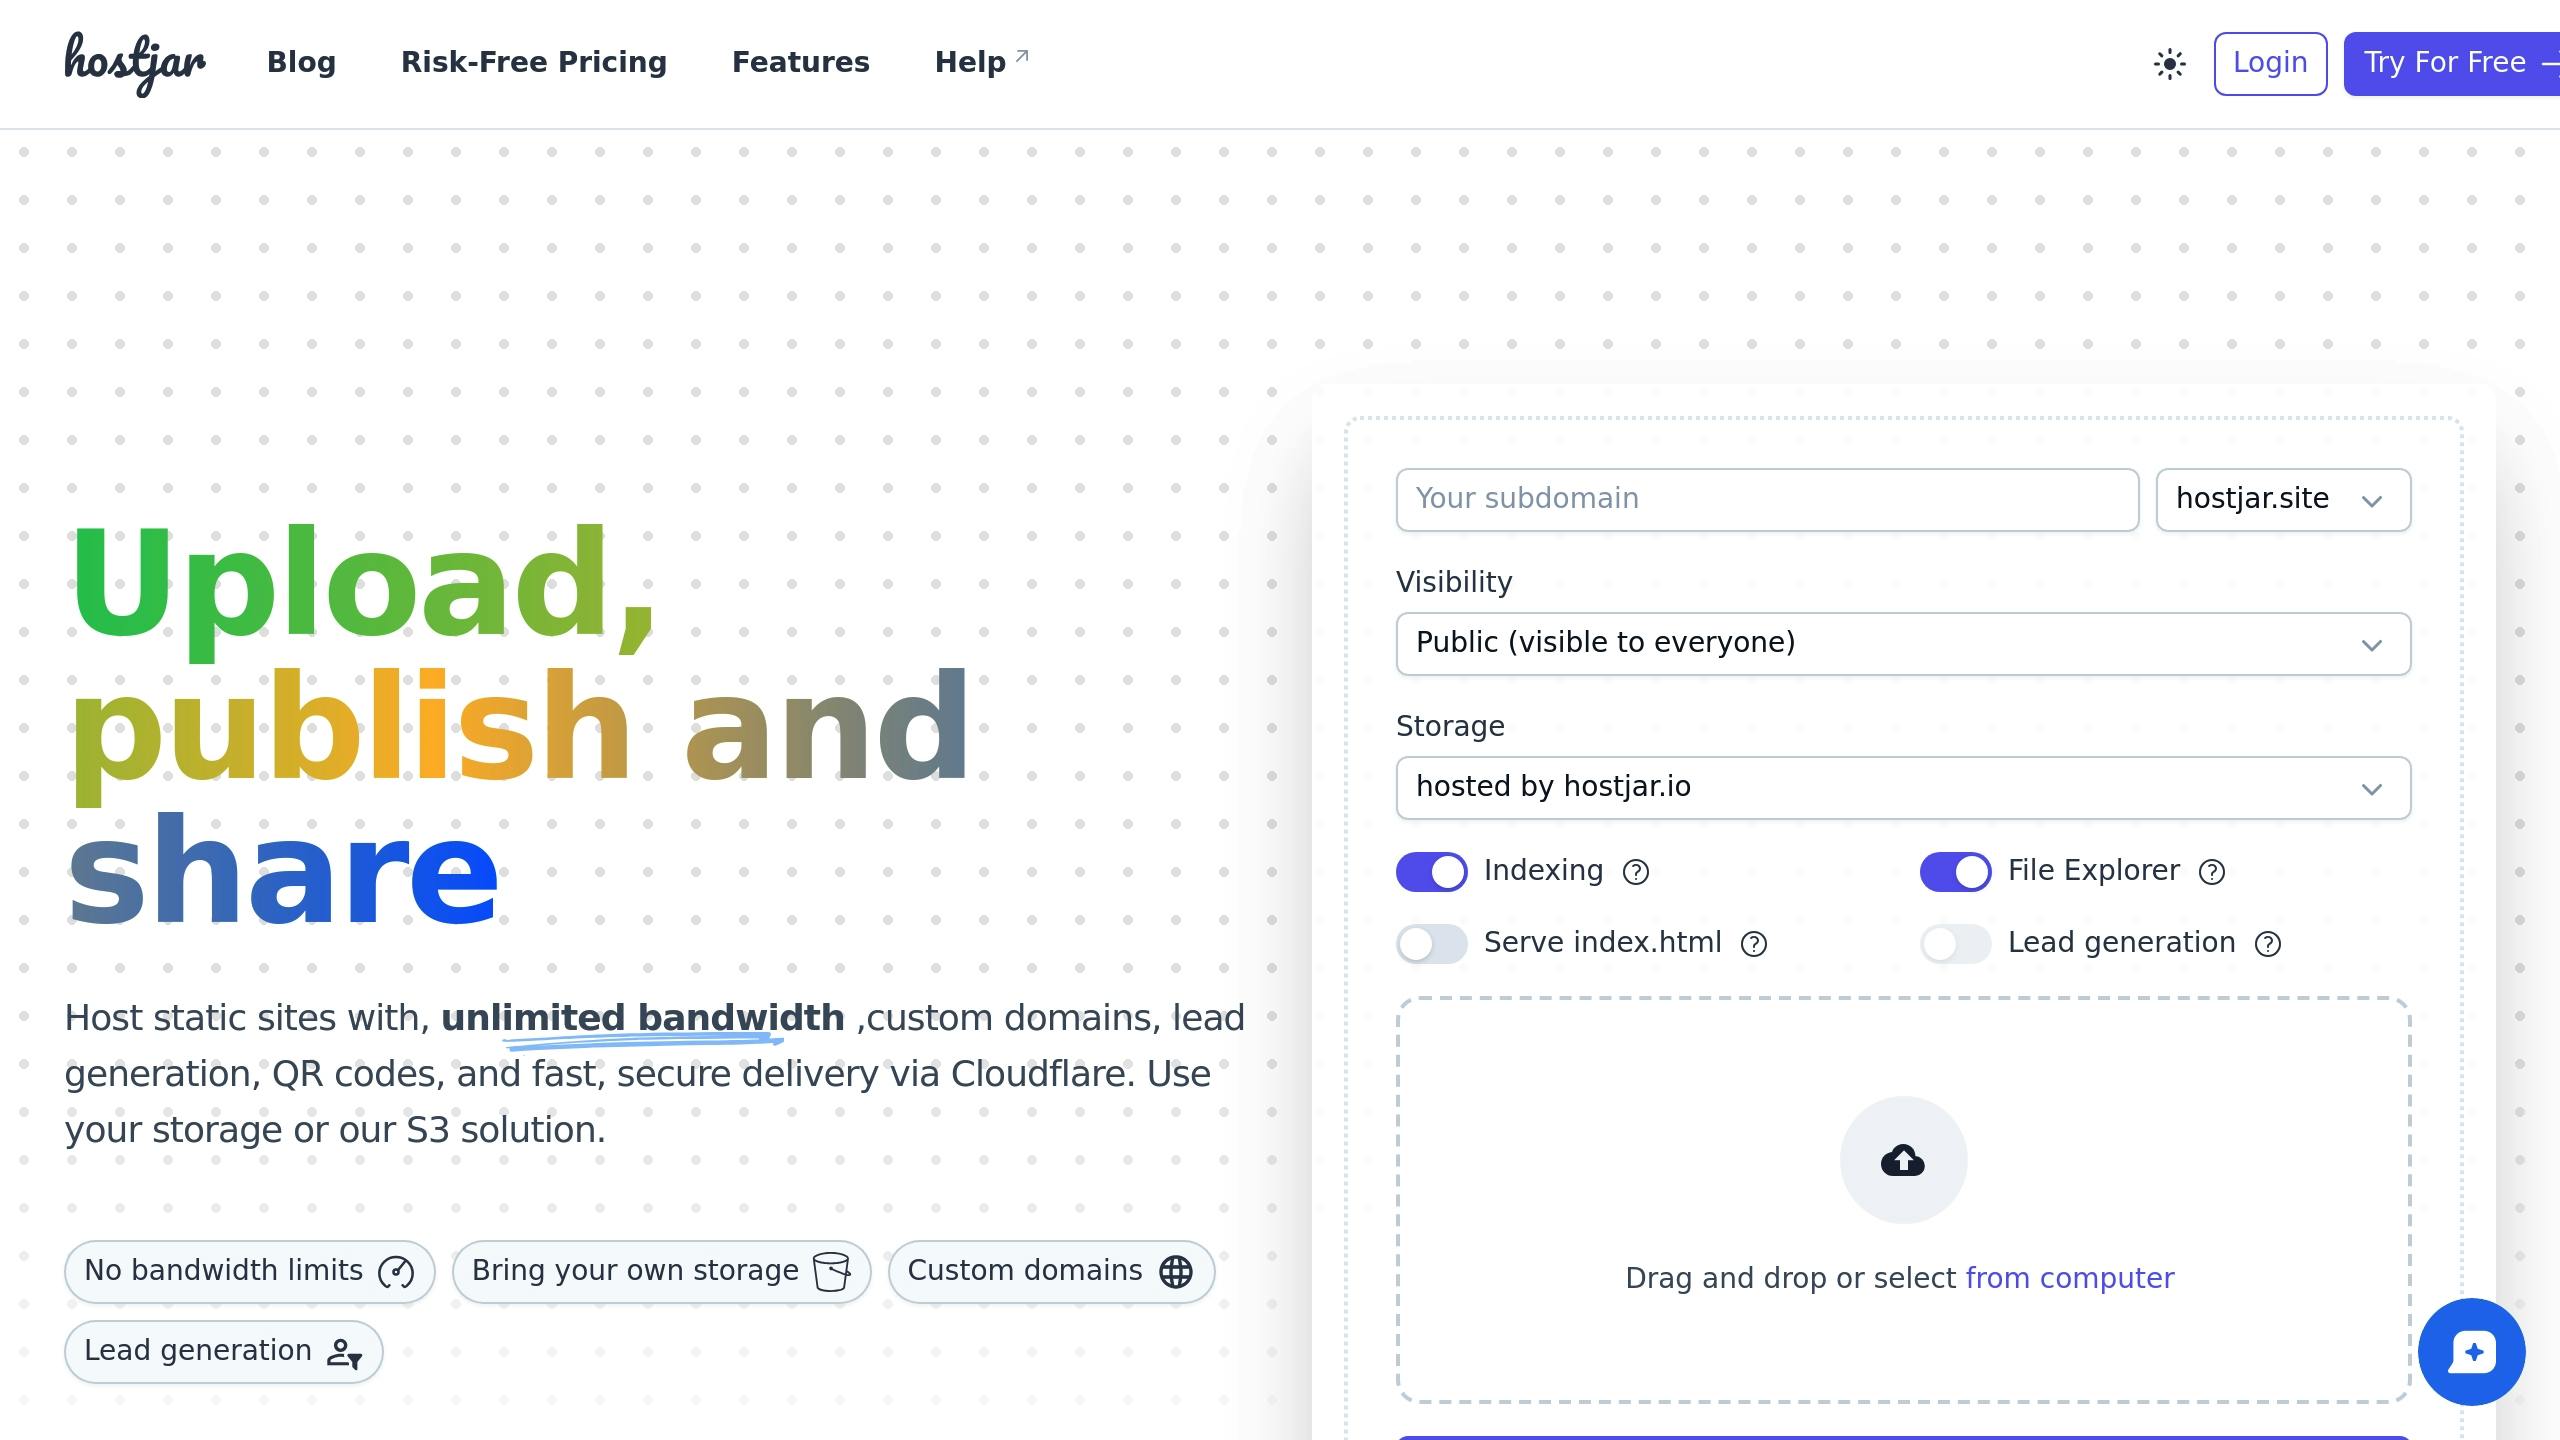
Create a Hostjar.io Account
Start by creating an account on Hostjar.io. You can choose between the free plan (limited to 3MB) or the Pro plan for $29/month, which offers a 1GB limit. After signing up, make sure to verify your email to complete the process.
How to Upload Files
You can upload your files in two simple ways:
- Drag and Drop: Drag your project folder directly onto the Hostjar.io dashboard.
- Manual Selection: Click on 'Upload Files' to choose specific files manually.
Both options work seamlessly with popular browsers like Chrome and Edge.
| File Type | Support Status | Size Limit |
|---|---|---|
| HTML/CSS/JS | Supported | Depends on your plan |
| Images (JPG, PNG) | Supported | Depends on your plan |
| Media files | Supported | Depends on your plan |
| PHP files | Not supported | N/A |
Verify Your Upload
Once your files are uploaded, Hostjar.io will provide a temporary URL (e.g., yourproject.hostjar.io) for previewing your site.
Here’s how to confirm everything is working:
- Open the temporary URL from your dashboard.
- Check all pages to ensure the file structure is intact.
- Confirm that all assets (images, scripts, etc.) are loading correctly.
Hostjar.io uses S3 storage and a global CDN network to ensure your files are stored securely and load quickly. Once everything is verified, you’re ready to move on to setting up your custom domain in the next step.
Expert Guide to Hosting Static Website with Custom Domain
::: @iframe https://www.youtube.com/embed/odWf_Jw2ajw :::
sbb-itb-4615289
Step 3: Set Up Custom Domain
Once your files are live, it’s time to connect your custom domain. This step helps establish your brand and gives your site a professional look.
Domain Registration
Head to the 'Domains' section in your Hostjar.io dashboard. Click 'Add Domain' and enter your domain name (e.g., yourdomain.com). Hostjar.io will automatically verify ownership for you.
Here’s what you get based on your plan:
- Pro Plan ($29/month): Add up to 5 custom domains.
- Plus Plan ($19/month): Add up to 3 custom domains.
- Lite Plan ($9/month): Limited to 1 custom domain.
After adding your domain, you’ll need to configure its DNS settings.
DNS Configuration
Set up the following DNS records with your domain registrar:
| Record Type | Name | Value | Purpose |
|---|---|---|---|
| A Record | @ | Provided by Hostjar.io | Points root domain |
| CNAME | www | yourproject.hostjar.io | Points www subdomain |
| CNAME | * | yourproject.hostjar.io | Points all subdomains |
Allow some time for DNS changes to propagate.
SSL Certificate Setup
Once your domain is connected, Hostjar.io takes care of the rest. It will automatically detect your domain, generate an SSL certificate, and enable HTTPS for secure browsing.
"Domain setup and SSL certificates are handled automatically. Support is quick and helpful." - Abdullah Mara, Web Developer
Support options vary by plan:
- Free Plan: Access community support forums.
- Lite, Plus, and Pro Plans: Email support is available, with priority given to Plus and Pro users.
Once your domain is live and secure, move on to verify everything in the next step.
Step 4: Adjust Site Settings
Fine-tune your website's functionality and security with Hostjar.io's flexible tools. These optional settings let you tweak security and visibility before going live.
Add Password Protection
Want to secure private content or share previews with clients? Setting up password protection is simple:
- Navigate to Site Settings > Security tab.
- Turn on Password Protection.
- Enter your chosen password.
- Click Save Changes.
Search Engine Settings
Need to keep your site hidden while it's under development or being used for private projects? You can control its visibility in search engines:
- Head to Site Settings > SEO section.
- Turn off Search Engine Indexing.
- Save your changes.
Create a Site QR Code
Make sharing your site easier with Hostjar.io's QR code generator, included in every plan:
- Go to Site Tools > QR Code Generator.
- Customize how your QR code looks.
- Download it or share it directly.
Step 5: Launch and Track Your Site
Get your site live and ensure everything's running smoothly using Hostjar.io's tools.
Verify Your Domain
Make sure your domain is set up correctly by following these steps:
- Visit your custom domain in multiple browsers to confirm it displays your site as expected.
- Check for SSL security by looking for the padlock icon in your browser's address bar.
Hostjar.io’s domain mapping system takes care of SSL verification automatically, usually completing it in just a few minutes. Once verified, test your site’s performance on various devices and browsers.
Test Your Site
Before going live, run these essential tests:
- Ensure compatibility across major browsers like Chrome, Firefox, Safari, and Edge.
- Check mobile responsiveness and loading speed to ensure your site performs well globally.
Tools for Managing Your Site
Hostjar.io’s dashboard offers a range of features to help you manage your site effectively:
| Feature | Function | Benefit |
|---|---|---|
| File Editor | Edit files with syntax highlighting in real-time | Quickly update without re-uploading files |
| Analytics Dashboard | Monitor visitor activity and site performance | Gain insights into traffic and behavior |
| Lead Capture | Track conversions directly | Evaluate your site’s effectiveness |
| Site Archive | Automatic backups | Safeguard your data from loss |
"Managing multiple sites is straightforward. The dashboard shows everything we need." - Fatih Acet, Tech Lead
Use the real-time analytics and lead capture tools to stay on top of visitor activity. These features make site management easier and help keep your site running smoothly.
Wrapping It Up
Hostjar.io offers a simple setup process paired with powerful tools, making it an excellent hosting solution. Deploying a static site with a custom domain is straightforward, thanks to its user-friendly features that cater to developers at any skill level.
What Makes Hostjar.io Stand Out?
Hostjar.io brings together key hosting essentials and advanced tools for a seamless experience. With Cloudflare's caching network, your site benefits from fast, global delivery. Plus, automatic SSL certification ensures your site is secure right from the start.
| Feature Category | Benefits | Details |
|---|---|---|
| Performance | Fast global delivery | Powered by Cloudflare's edge network |
| Security | Hassle-free SSL | Certificates generated automatically |
| Storage | Flexible solutions | Built-in S3 or custom integrations |
| Management | Easy updates | Inline file editor with live preview |
| Analytics | Insightful tracking | Monitor traffic and conversions |
These features make Hostjar.io a solid choice for hosting static sites efficiently and securely.
Ready to Get Started?
Hostjar.io is easy to set up and budget-friendly. The free plan includes custom domains and supports up to 10,000 monthly visitors. Paid plans start as low as $1 for the first three months.
"The storage and caching features keep our sites fast and reliable. No bandwidth worries." - Emma Rodriguez, IT Manager
Here’s a quick look at the plans:
- Free: Ideal for small projects with 1 site and 3MB storage
- Lite: $9/month for 10 sites and 100K monthly visitors
- Plus: $19/month for 30 sites and 500K monthly visitors
- Pro: $29/month for unlimited sites and 1M monthly visitors
All plans include extras like lead capture tools, password protection, and QR code generation, making Hostjar.io suitable for everyone - from beginners to seasoned developers.
Why Lead Generation Matters for Small Websites (And How to Start)
Explain why even small sites benefit from capturing leads, with tips on simple methods. Mention Hostjar.io’s lead generation tool as an option, alongside forms or email sign-ups.
How to Host a Static Website for Free in 2025: A Step-by-Step Guide
Learn how to get your static website online for free in 2025 with this beginner-friendly guide. From uploading files to securing your site, we'll walk you through every step using a simple, no-cost hosting solution.